Confused about how handles are measured? Check out our FAQ's page -
http://www.countryseat.com/faq.htm#how - for more info and pictures.
Wednesday, May 25, 2011


Monday, May 23, 2011
Open Weave
Open Weave this Friday, May 27th from 12-3 - for more details see - http://www.countryseat.com/basketclasses.htm#open
Friday, May 20, 2011
New Pattern
Anne Bowers' Day 1 pattern Mayan Sun now available for purchase - http://catalog.countryseat.com/mayansunwallbasketpattern-bowers.aspx
 See class pictures and much more on our Facebook page - http://www.facebook.com/thecountryseat
Tuesday, May 17, 2011
What to do with Wire Handles & Hangers
Wire Handles & Hangers
Q: How are the wire hangers used?
A: Wires are most commonly used as hangers for wall baskets but can also be used just for decoration. Place the horizontal bar of the wire on top of the last row of weaving. Hold in place with a 1/2" rubber tipped clamp. Tuck down the stakes over the wire and into the weaving as usual and apply the rim. Make sure the the horizontal bar is hidden in the rim and the lasher goes completely around it. The wire will be held securely in place after lashing the rim.
The bean pot and jelly wires are usually attached over the center spokes of the basket with wire eyelets (separate loops of wire). Only the horizontal bars of the eyelets are lashed into the rim. The eyelets enable the handle to swing.
A few types of jelly and bean pot wires do not have a pre-bent loop. These handles with the straight ends can be attached in several ways:
1) Using a pair of pliers, bend the bottom into a loop and attach to mini eyelets or large eyelets purchased separately and attach as above.
2) Complete the basket and lash the rim. Now bend the bottom of the wire under and back around the rim. The end can be twisted back around the wire above the rim.
3) Using a pair of pliers, bend the bottom of the wire 90 degrees. Tuck your stakes over the bend and lash the rim as usual.
#2 & #3 will result in a stationary handle.
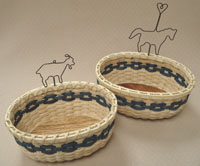
Q: How are the wire hangers used?
A: Wires are most commonly used as hangers for wall baskets but can also be used just for decoration. Place the horizontal bar of the wire on top of the last row of weaving. Hold in place with a 1/2" rubber tipped clamp. Tuck down the stakes over the wire and into the weaving as usual and apply the rim. Make sure the the horizontal bar is hidden in the rim and the lasher goes completely around it. The wire will be held securely in place after lashing the rim.
The bean pot and jelly wires are usually attached over the center spokes of the basket with wire eyelets (separate loops of wire). Only the horizontal bars of the eyelets are lashed into the rim. The eyelets enable the handle to swing.
A few types of jelly and bean pot wires do not have a pre-bent loop. These handles with the straight ends can be attached in several ways:
1) Using a pair of pliers, bend the bottom into a loop and attach to mini eyelets or large eyelets purchased separately and attach as above.
2) Complete the basket and lash the rim. Now bend the bottom of the wire under and back around the rim. The end can be twisted back around the wire above the rim.
3) Using a pair of pliers, bend the bottom of the wire 90 degrees. Tuck your stakes over the bend and lash the rim as usual.
#2 & #3 will result in a stationary handle.
Friday, May 6, 2011

Thursday, April 14, 2011
New Gourd & Fiber Book
Gourd & Fiber book - $19.95
http://catalog.countryseat.com/GourdsandFiber-bysummitandwidess.aspx
SOFTCOVER -
Jim Widess and Ginger Summit
Two of the world's leading experts combine gourd decorating and fiber arts for a fresh, up-to-date take on a centuries-old craft. Ginger Summit and Jim Widess will inspire gourd aficionados with a wide range of techniques, from coiling and plaiting to stitching and lacing, knotting and looping, random weave and more.
Thirty fabulous projects use pine needles, silk cord, leather, and beads.
144 pages

http://catalog.countryseat.com/GourdsandFiber-bysummitandwidess.aspx
SOFTCOVER -
Jim Widess and Ginger Summit
Two of the world's leading experts combine gourd decorating and fiber arts for a fresh, up-to-date take on a centuries-old craft. Ginger Summit and Jim Widess will inspire gourd aficionados with a wide range of techniques, from coiling and plaiting to stitching and lacing, knotting and looping, random weave and more.
Thirty fabulous projects use pine needles, silk cord, leather, and beads.
144 pages
Thursday, December 16, 2010
Chase Weave
Q: The pattern calls for the "weave and chase" method. Could someone explain this to me in simple terms?
A: Chase weave is weaving with two pieces so that one "chases" the other. This allows you to do a continuous weave without having to split a spoke. The weavers are traditionally the same size.
Taper each piece for about 6 inches. Start weaving with one piece on one of the long sides of the base. Stop when you get to the opposite side. Now start weaving with the other piece until you catch up with piece #1. You'll soon find what works best for you - weaving until you catch up to the other piece, keeping the pieces close together and weaving over a couple of spokes with each piece, or keeping the ends on opposite sides of the basket.
When you run out, it's ended the same way as a start/stop weaving. Overlap the ends of the old weaver and new weaver for 4 spokes, hiding both ends behind a spoke.
When you reach the top of the basket, taper each end again for about 6 inches and stop them about where you started. Now weave a rim row and use this to tuck your stakes over.
A: Chase weave is weaving with two pieces so that one "chases" the other. This allows you to do a continuous weave without having to split a spoke. The weavers are traditionally the same size.
Taper each piece for about 6 inches. Start weaving with one piece on one of the long sides of the base. Stop when you get to the opposite side. Now start weaving with the other piece until you catch up with piece #1. You'll soon find what works best for you - weaving until you catch up to the other piece, keeping the pieces close together and weaving over a couple of spokes with each piece, or keeping the ends on opposite sides of the basket.
When you run out, it's ended the same way as a start/stop weaving. Overlap the ends of the old weaver and new weaver for 4 spokes, hiding both ends behind a spoke.
When you reach the top of the basket, taper each end again for about 6 inches and stop them about where you started. Now weave a rim row and use this to tuck your stakes over.
Subscribe to:
Posts (Atom)


 Posts
Posts


